Thursday, 7 February 2013

Saving User Interface Customization in ArcMap

Saving User Interface Customization in ArcMap

Since every time the SAIT computers are restarted they reload the image of the Operating System, any changes you make to the ArcGIS interface are lost each time you restart the computer. There is a way to get around this by saving the interface template, and then using that file to open ArcGIS rather than the program executable.

Once you make changes, ie: adding extra buttons to the edit toolbar like in the image below.


ArcGIS updates the template file found at C:\Users\123456\AppData\Roaming\ESRI\Desktop10.0\ArcMap\Templates\Normal.mxt where 123456 is your student ID with no leading zeroes.

Copy this file to your H: drive and create a shortcut to C:\Users\123456\AppData\Roaming\ESRI\Desktop10.0\ArcMap\Templates\ (Right click in Windows Explorer, new>shortcut, paste the path into the dialogue)

Copy the Normal.mxt file into the short cut folder, select Copy and Replace, then open ArcMap. It will then open ArcGIS with your interface customizations on any workstation at SAIT.


As you can see, a blank document opens with the same editor toolbar buttons that you created before.

Hopefully this helps anyone who wants to customize their ArcMap interface and have it follow them.

Tuesday, 29 January 2013

Connect to SAIT email in Outlook

Connect to SAIT email in Outlook via VPN

There's also been a few questions about how to connect to SAIT email using outlook on your laptop or home network. In addition to emails this also allows you to use your SAIT exchange calendar from your home computer. The following steps are for Outlook 2010, similar server settings will be used in other versions of Outlook.

Disclaimer: I am not affiliated with SAIT or the help desk in any way, I am posting this as a student looking to help his classmates. I am not responsible for any data loss or missed assignments if something should go wrong and will not keep this post up to date beyond my time as a SAIT student.

Note: You must be connected to the VPN to be able to access your drives, even after they have been mapped. So if you come back in a few days and they don't work, make sure you are connected to the VPN. For instructions on setting up the VPN click here.

The following steps are all to be taken on your home computer, laptop etc

  1. Connect to the SAIT VPN (http://vpn.sait.ca) I will write a tutorial on connecting to the VPN if people need one.
  2. Launch Oulook via the start menu.
  3. If this is your first time setting up an account in Outlook, click Manually Configure Server Settings, Next, Microsoft Exchange or compatible service, Next
  4. If you are adding SAIT email as an additional account click File> Account Settings > Account Settings.. > New
  5. Set up the account settings as follows:
    • Server EX5.ACDM.DS.SAIT.CA
      Username: Firstname.Lastname@edu.sait.ca (Your sait email address)


  6. Click next and if necessary enter your ACDM\Student ID (no leading zeroes) and Password - the same info you use to login to a sait computer. Check 'Remember my credentials'.


That is it, at this point you should see your inbox start to fill up with your sait email, be able to send email from the SAIT account and access your exchange calendar. If anyone has questions or is unable to get it working please leave a comment and I'll help when I have some free time.

Monday, 28 January 2013

Mapping SAIT shared drives

Mapping SAIT network drives via VPN

Hello folks. I have had a number of people asking me in class how to get their H: and O: drives working while connected to the SAIT VPN. Its a little tricky to explain without examples and enough people were asking that I thought it would be simpler to write a quick post about it. The post uses screenshots from Windows 7, the process is slightly different in other versions, but is quite similar in all modern versions of Windows.

Disclaimer: I am not affiliated with SAIT or the help desk in any way, I am posting this as a student looking to help his classmates. I am not responsible for any data loss or missed assignments if something should go wrong and will not keep this post up to date beyond my time as a SAIT student.

Note: You must be connected to the VPN to be able to access your drives, even after they have been mapped. So if you come back in a few days and they don't work, make sure you are connected to the VPN. For instructions on setting up the VPN click here.

The following steps are all to be taken on your home computer, laptop etc

  1. Connect to the SAIT VPN (http://vpn.sait.ca) I will write a tutorial on connecting to the VPN if people need one.
  2. Open Windows Explorer to 'Computer' via the start menu.
  3. Find and click 'Map Network Drive' along the top toolbar.


  4. The following dialog should open:


  5. Select whichever drive letter you prefer (I used H: and O: for the respective drives) and enter the following folder paths into the Folder field (you need to include the \\ at the beginning):

    To connect to the SAIT O: drive - \\fil1612.ACDM.DS.SAIT.CA\rootdfs

    To connect to the SAIT H: drive - \\vfil241.acdm.ds.sait.ca\h_student$\<student id> (replace with your student ID, no leading 0's)


  6. When you try to connect you will be prompted for your SAIT username and password. You must specify the ACDM domain by typing ACDM\<Student ID> and your password.


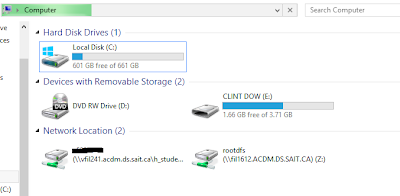
  7. You should now see the drives listed under 'Computer' in the 'Network Location' section.

That's it! You should now have access to your SAIT drives from home. Again, remember these will only work when you are connected to the VPN. If you have any difficulty please leave a comment and I will do my best to help as time allows.