Mapping SAIT network drives via VPN
Hello folks. I have had a number of people asking me in class how to get their H: and O: drives working while connected to the SAIT VPN. Its a little tricky to explain without examples and enough people were asking that I thought it would be simpler to write a quick post about it. The post uses screenshots from Windows 7, the process is slightly different in other versions, but is quite similar in all modern versions of Windows.
Disclaimer: I am not affiliated with SAIT or the help desk in any way, I am posting this as a student looking to help his classmates. I am not responsible for any data loss or missed assignments if something should go wrong and will not keep this post up to date beyond my time as a SAIT student.
Note: You must be connected to the VPN to be able to access your drives, even after they have been mapped. So if you come back in a few days and they don't work, make sure you are connected to the VPN. For instructions on setting up the VPN click here.
The following steps are all to be taken on your home computer, laptop etc
- Connect to the SAIT VPN (http://vpn.sait.ca) I will write a tutorial on connecting to the VPN if people need one.
- Open Windows Explorer to 'Computer' via the start menu.
- Find and click 'Map Network Drive' along the top toolbar.

- The following dialog should open:

- Select whichever drive letter you prefer (I used H: and O: for the respective drives) and enter the following folder paths into the Folder field (you need to include the \\ at the beginning):
To connect to the SAIT O: drive - \\fil1612.ACDM.DS.SAIT.CA\rootdfs
To connect to the SAIT H: drive - \\vfil241.acdm.ds.sait.ca\h_student$\<student id>(replace with your student ID, no leading 0's) - When you try to connect you will be prompted for your SAIT username and password. You must specify the ACDM domain by typing ACDM\<Student ID> and your password.

- You should now see the drives listed under 'Computer' in the 'Network Location' section.
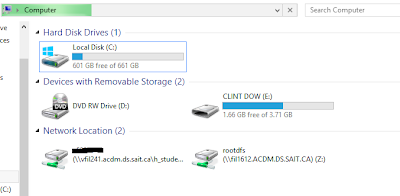


That's it! You should now have access to your SAIT drives from home. Again, remember these will only work when you are connected to the VPN. If you have any difficulty please leave a comment and I will do my best to help as time allows.
I am having issues with step number 6. I have connected to SAIT's VPN, and have followed step number 6 exactly (double and triple checking the input information), but upon trying to map the network drive, I keep getting the following error:
ReplyDelete"The mapped network drive could not be created because the following error has occurred:
The specified network resource or device is no longer available"
I have been trying to map the drive for a few days now, and have been receiving this error every time.
Any ideas?
Are you able to connect to other sait services such as email on the vpn to confirm that it is working properly?
ReplyDeleteFor your student ID in both the network address and login prompt you should be entering just the 6 digits no leading zeroes or square brackets. ie \\vfil241.acdm.ds.sait.ca\h_student$\123456
That error message is unfortunately very general it could be anything from your antivirus/firewall preventing access to the vpn drives, to incorrect file path when you are trying to map the drive. If you have one perhaps try to temporarily disable your AV and try to connect. I reconnected this morning so I can confirm its not SAIT blocking the connections.
Let me know how it goes I'll try and help as much as I can as time allows.
I've added the cisco client as a firewall exception, but that has not solved my problem. I've done a lot of googling and have read many forums, trying out different things here and there, but it still gives the same error. I called SAIT technical support and they told me to go see them in person at one of the help desks, so I will be doing that. If they can fix it, I'll be sure to post how it was done. Thanks.
ReplyDeleteThank you Clint for sharing this.
ReplyDeleteYour method had been working very well till yesterday. It stopped in the early morning of Dec 29,2014.Could you please check it out to see how to make it work again?
ReplyDeleteReally appreciate your post and help!
Hi Clint. Are you still updating your blog?
ReplyDeleteHi all,
ReplyDeleteUnfortunately I'm not at SAIT any longer and don't have access to their network, so I'm unable to update this method if they've changed it. Generally speaking, the UNC path (that is, the path that starts with \\computername) is found in the properties of your shared drives - it is likely these paths will change and that caused your issues. Hopefully that helps!